
Single page web application displaying live data from LoRa devices thanks to the Semtech starter kit.
Deployed demo available on Surge
- LoRaMote device of Semtech's starter kit
- Nucleo device of Semtech's starter kit
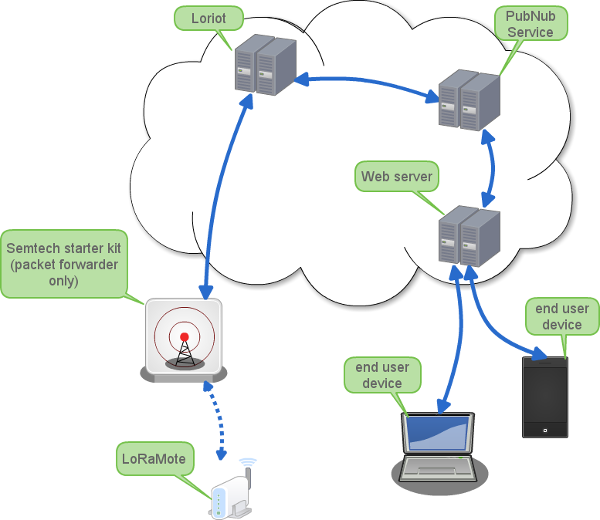
Using the starter kit and some web based services, this web app displays data coming from your LoRa devices.
Follow the Semtech user guide to setup the LoRaMote or Nucleo end-point devices.
You must stop the current packet forwarder and change its configuration files.
- In local.conf, change the gateway ID
- In global.conf, change the gateway ID, point to loriot service and be sure that the port values are correct:
   "gateway_ID": "B827EBFFFF6F8A98",
   /* change with default server address/ports, or overwrite in local_conf.json */
   "server_address": "mq.loriot.io",
   "serv_port_up": 1780,
   "serv_port_down": 1780,
You can then restart the packet forwarder and check its initial output which displays the current settings (gateway ID, server and port)
Once the gateway is configured, you should be able to setup your loriot.io sample app and see the LoRa frames conming in.
The last thing to do is to create a PubNub channel to publish to. You can then configure the loriot app to publish data to PubNub (PubNub is one of the possible outputs).
Here you are: your LoRaMote devices are pushing data to the PubNub service! You just have to subscribe to the correct channel to receive this data.
This web app subscribes to the previously configured PubNub service and decodes and displays live data.
You'll have to change the PubNub Upstream channel and subscribe key to point to your pubnub account. Just open, the popup window to enter your PubNub credentials (click on Setup icon in the footer of the page)
If the device payload embeds the device GPS position (latitude and longitude), its marker will be automatically positioned on the map. If the device does not have any GPS capability, its marker will appear in a default position. You can control this default position by setting defaultLatitude and defaultLongitude values in localStorage.
First, install the dependencies:
npm install
Then watch your changes at http://localhost:3333:
brunch w --server
Do not forget to run the tests
npm test
And finally, deploy to production:
brunch b -p
and copy/paste the public directory to your web server directory or deploy with Surge and that's it :)
You can also use the amazing Surge to serve your static website:
npm install -g surge
cd public
surge
You can simulate upstream PubNub data from LoRa end-points using the node-red based simulator.
npm install -g node-red
npm install -g node-red-contrib-pubnub
and run the simulator:
npm run simu
note: As we are not web development experts, any comment/help/PR is appreciated and we'll be happy to add your name to the CONTRIBUTORS file ;)